|
Here is information on how to install our custom made pull
out shelves in your kitchen and bathroom cabinets. There are four ways to mount pull out shelves into your
cabinet. The first and most common is mounting on an existing full
depth shelf or the cabinet base. The second is mounting to an existing half
shelf depth that is 6" - 12" deep. The third is to mount to the rear
wall with sockets. The forth method is mount to the cabinet side
walls. All of these installation methods have similarities. We will cover
the basic steps first, then you can go on to the specifics for your method of
installation
Use the shelf
The number one tip is to let the sliding shelf be your tool for setting
the slides or drawer glides. There are points in every method of installation that will be
easiest to accomplish when you use the pull out shelf as your placement guide. The drawer
slides that we use have a control side and a free side. The right side drawer slides
are the control side, the track that the wheel rolls in is a captive one. The
metal is bent around the wheel and the wheel will only track in that groove. The
left side drawer slide is the free side that allows for adjustment of the assembly. For
this reason it is very important to pay attention to the left side slide. Any
problems with drawer slide alignment will be evident here, the right side drawer
slide will align
itself. If your existing shelf is adjustable
you will need to look at two things. The first is what are the clips or pins that are
holding the shelf up made of? If they are plastic you need to replace them with metal
clips or pins. The front mounting of the shelf will be subjected to twice the
weight it is currently exposed to when the pull out shelf is extended. The second
consideration goes right along with the first in that when the loaded shelf is
extended it will want to lift up in the back. If there is nothing holding the
back of the shelf down the pull out shelf will drop when the back of your fixed
shelf tips up. This is easily remedied by place a
couple of screws in either the back or the side walls of your cabinet (which ever is thicker,
but don't go through to an exposed wall) just above the existing shelf and leave
the head of the screw sticking out far enough to hold the shelf down.
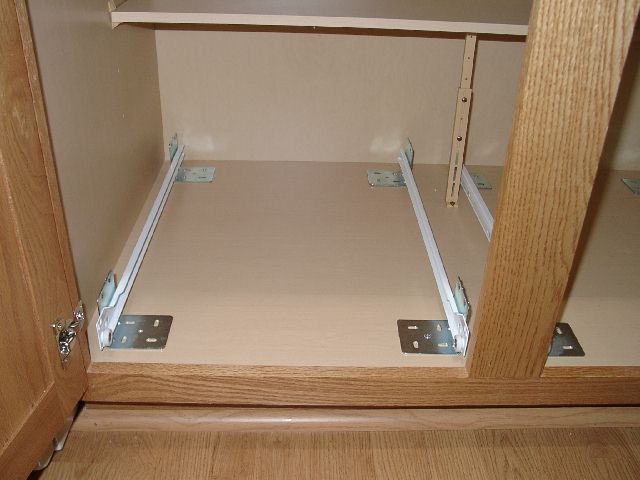
Full shelf installation (base mount)
The easiest and usually strongest method of installing our pull
out shelves is when you are mounting onto a full depth existing shelf or the
cabinet base. For a full shelf installation you should have two "L"
shaped brackets on each cabinet slide. The wheeled end of the cabinet part of
the slide is the front. Set the slides onto the existing shelf or cabinet base
at the approximate width of the sliding shelf and place a screw in one of the
front brackets. I prefer to start on the side of the cabinet that does not have
the door hinge - See picture. If the cabinet has two
doors you put the screw in the right side slide (the right side is the
controlling side). Engage the shelf into the
cabinet slides by setting the wheeled end of the shelf slide over the wheeled
end of the cabinet slide. The most important side to get in place is the right
side. You can always slip the left side into place after getting the right side
in properly. Insert the shelf fully into the cabinet and align the front of the
shelf square with your cabinet and with the proper set back (all you need is
enough to clear the doors when they are closed but you can adjust the set back
to whatever looks right). The proper set back depends on your
cabinet depth but it is usually about 1/2" to 3/4" back from the
inside edge of the cabinet face frame. Get your screwdriver ready! When you have
the shelf adjusted press down slightly and slide the shelf forward just far
enough to expose the rear brackets. Insert a screw in one of the slots in the
right rear bracket. Use the hole that goes side to side so you can adjust it
latter, tighten moderately. Now slide the shelf back into place and check the
alignment. When it is adjusted properly slide the shelf out again to expose the
rear bracket and place a screw in the opposite side rear bracket again using a slotted hole
that
goes from left to right and tighten moderately. Once again slide the shelf in and
check alignment. If all is well you can carefully slide of the shelf without
disturbing the position of the loose front bracket, this may take a couple of tries.
Install a screw in the unattached front bracket the same as you did for the
other brackets.
Insert the shelf again and check alignment. Remember to pay careful attention to
the left side slide if the gap is too large in the rear the shelf will roll
great but as soon as you add weight you will get a bump when you slide it out.
After you get everything aligned you can remove the shelf and install a screw in
the center hole of each of the brackets to lock them in place, two screws per bracket is
all that is needed. Congratulations your shelf is done!!! Well almost, see plastic
thing.
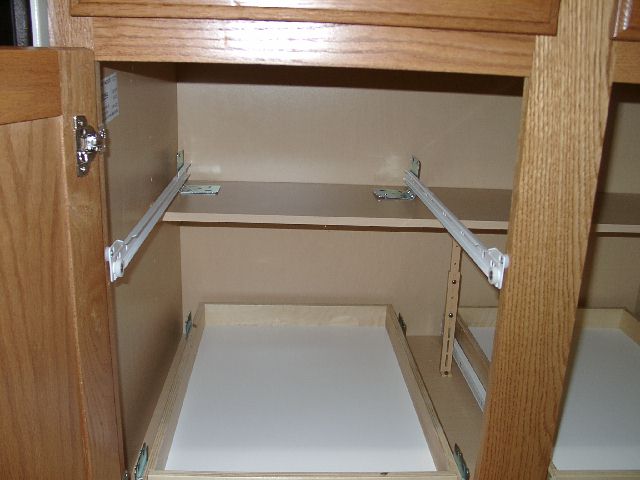
The second method of installing sliding shelves is also the second easiest.
It is important to note that the half shelf installation can only be done with
the standard 3/4 extension slides. The full extension slides will not work with
this method of installation. You will need a small level, preferably one
with a magnetic strip on one side. The slides for your half shelf installation will have one metal
"L" shaped bracket mounted near the rear of the slide. The end with the wheels is
the front. If you have brackets in the rear and front the front ones will not
be needed and should be removed. Set the rear bracket on the existing shelf and
place the front edge of the slide against the cabinet face frame, back about
3/16" from the front. Place your level on the slide and level it. When you
have the slide level, mark the location of the front hole in the slide on to
your face frame. You can
then measure the height and make a corresponding mark on the other side face
frame. It is best to pre-drill a small pilot hole in your face frame to keep the
it from splitting. You can then screw the front of the slide into the
pre-drilled hole - See picture. Once you have the front of the slides attached you
can set the shelf in place by lifting the wheels on the rear of the shelf slides
over the wheels on the front of the cabinet slides. Pay careful attention to the
right side slide. Insert the shelf all the way into the cabinet and align
the shelf to be square with the cabinet front. If there is too much space
between the cabinet face frames you will need to insert spacers or washers to
build out. You can order spacers from us in 1/8", 3/8", and 1/2"
sizes. You may also be able to find something similar in a local hardware store
or use flat washers.
Get your screwdriver ready! Check the alignment of the left side slide and when
it is properly aligned press down slightly on the shelf and open it far enough
to see the rear bracket. Place a screw in one of the slotted holes and tighten
moderately. Reinsert the shelf and check slide alignment. When alignment is
correct repeat the process of extending the shelf and insert a screw in the
other side's bracket. Again insert the shelf and adjust as needed. When
everything is aligned extend the shelf again and place a screw in the center
hole of the bracket to lock it in place. Two screws per bracket is all that is
needed for proper support. Congratulations your shelf is done!!!
Well almost, see plastic thing.
Rear mount sockets are a great option mounting for shelves in a
cabinet that does not have an existing shelf provided that there will not be too
much weight in the shelf (less than 50 pounds). They are perfect for adding a shelf in a
bathroom cabinet. The main limitation is if they are loaded with a lot of weight
the plastic brackets can succumb to the stress (that may just be because we are
in Arizona and plastic dries out so quickly here). Like the half shelf the rear
mount socket option is only available with the standard 3/4 extension slides.
The full extension slides will not work with this installation method. The first step is to determine the height that you want the shelf. Make a mark
on both cabinet face frames for the bottom of the shelf. Insert the cabinet
slides partially into the plastic sockets (you must have specified a rear socket
installation when ordering) note the brackets are different for left and right
sides. Attach the front end of the slides (the end with the wheels) to the
cabinet face frame where you marked. You will need to push the slide slightly
against the back wall of the cabinet to get the socket seated to the needed
depth. Install the shelf by lifting the rear end of the shelf slides (the end
with the wheels) over the wheels on the front of the cabinet slides. Slide the
shelf in completely and align it to be square with the front of the cabinet. Now
comes the fun part. Make a line on the back wall to mark the position of each
slide for the horizontal placement. You can now remove the shelf and place a
level on the cabinet slide. Align the slide with the previous line that you made
and level the height. Now you can either install one screw in the socket or mark
another line for the vertical position. Repeat this process for the other side
and after you have one screw in each socket reinstall the shelf and check for
proper operation. Once you have the shelf adjusted, install at least one more
screw in each socket. If you are having trouble getting the shelf to slide
smoothly make sure the slides are parallel to each other and not twisted.
Congratulations your shelf is done!!! Well almost, see plastic
thing.
When you need more weight capacity than the rear socket method
can provide and you either don't have or don't want full or half shelves in your
cabinet, the answer is side mounting. We can provide spacers to install the
cabinet slides to the cabinet side walls. The problem is the cabinet side walls
are usually not more than 1/2" thick and there is about 1" of space or
more that needs to be spaced out. Leverage will lead to this being a weak
sliding shelf installation. The exception to this is with Euro style cabinets, see the
information on euro cabinets on our measuring
guide page. If you can install vertical strips of wood on both sides
(two on each side, one near the front and the other near the back) that provide
the proper fill to match the space behind the cabinet face frame, a side
mount installation can be the strongest and most space efficient installation.
It is best to use a piece of wood the same thickness as the space behind the
face frame that runs from the bottom of the cabinet to above the height that you
want the shelf installed. You can glue and screw this piece of wood in place to
make a secure attachment. After the wood is installed you can measure up and
make a mark where you want the sliding shelves installed. Simple screw the
drawer slides in
where marked and you should be able to install the sliding shelf. Just lift the
rear end of the shelf slides (the end with the wheel) over the wheels on the
front end of the cabinet slides. Insert the sliding shelf fully and check for alignment
paying careful attention to the left side drawer slide alignment, adjust as needed.
Congratulations your pull out shelf is done!!! Well almost, see plastic
thing.
Finally we come to that white plastic thing. That thing is a
door protector. It is mounted to the side of the shelf that the cabinet door is
hinged on. If you have a door on both sides you will need two door protectors.
The purpose of the door protector is of course to protect the door. The plastic
sticks out about 1/16" more than the drawer slide to keep you from
scratching the door in case it is not opened fully before sliding out the shelf.
Just screw the door protector to the side of the shelf (one screw). Watch for
hinge clearance and if the door has a recessed panel make sure you mount the
door protector as low as possible.
Disclaimer
This page is offered as a guide for installing a pull out shelf
and it is not intended to offer every detail for every possible installation. It
is expected that the home improvement do-it-yourselfer has sufficient knowledge
as to judge the soundness of their installation of kitchen and bathroom shelves.
If you do not feel comfortable with the quality of your installation you should
seek the assistance of a qualified individual or company to evaluate the
installation.
| 

